[Chapter 4] Security Protection
4.1 Why Security Protection is Necessary
Security protection for Linux servers is a vast and complex topic. Countless websites, apps, services, and even offline infrastructure are built upon the foundation of Linux. Behind this lies enormous economic interest and commercial value, which naturally implies that the black/gray market has a huge motivation to attack. However, these services are so critical that major security vulnerabilities simply cannot be allowed. Consequently, countless operations professionals strive on the battlefield of security offense and defense, allowing everyone to enjoy a basically stable modern digital life.
Now that you own a VPS and will be opening up its data access channels to achieve traffic forwarding, you have effectively placed yourself on the front lines of this security battlefield, facing all risks directly. However, due to a lack of knowledge and information, newcomers often view security issues with polarized attitudes: they either feel it's trivial and has nothing to do with them, or they feel the weight is unbearable and live in constant fear.
- For the former, my advice is: No security matter is too small. Try to research security information as much as possible to avoid regretting it only after you have suffered a loss.
- For the latter, my advice is: Don't panic. Our servers generally don't hold high value and won't attract high-level targeted attacks. We mostly face malicious scanning and login attempts by automated scripts. Just follow this article to implement basic protections.
4.2 What Exactly Are the Specific Risks?
Just as we configured in the "Remote Login" chapter, anyone only needs to know four elements—[IP Address] + [Port] + [Username] + [Password]—to log into your VPS server. Obviously, the security of these four elements is the baseline we need to protect. Let's analyze them one by one:
[IP Address]: Malicious scripts randomly attempt and scan IP ranges. You can simply consider this public information; it cannot be hidden.
[Port]: If using the default port, then [Port =
22].[Username]: If using the default user, then [Username =
root].[Password]: There is no default password; it is definitely randomly generated by the VPS backend or set by you. This means if your server uses default settings, three of the four elements are already known. The security of your entire server relies entirely on a small string of passwords. Here are a few scenarios:
- If you use the random password generated by the VPS panel, it usually contains a dozen mixed-case letters and symbols, which is relatively safe.
- If, for the sake of memory, you changed the password to something ultra-weak like
123456, cracking your VPS server would be effortless. - If, for the sake of memory, you changed the password to something complex but used elsewhere, it is essentially unsafe. You must understand that hackers have "cheat sheets," such as Password Dictionaries, containing tens of thousands to millions of leaked real passwords.
But you must understand, no hacker is actually sitting in front of a computer trying your password one by one. All attack attempts are carried out automatically by malicious scripts working 24/7. Perhaps while you are sound asleep, your server is enduring round after round of impacts.
Once the password is successfully brute-forced, it means all your four elements are mastered by the attacker. The malicious script will quickly log in, obtain the highest
rootcontrol of the server, install/deploy its malicious services, and then use your server to do various bad things 24 hours a day (such as mining, spreading viruses, sending spam/phishing emails, acting as a BT relay, or even becoming a public node for the dark web, etc.). If the malicious script is restrained, it can be quite stealthy. Since newcomers generally don't observe VPS login records, process changes, CPU usage, or traffic changes, it is difficult to discover that you have been hacked until your VPS provider bans your account or you receive a lawyer's letter.Don't forget, you likely used real payment information to obtain the VPS, and you leave your IP address when logging into various websites and social platforms. These are directly or indirectly related to your identity. Once these bad things happen, they will inevitably be linked to you.
4.3 What Security Protections Will We Implement?
Based on the analysis above, what we need to do is naturally strengthen the [Port], [Username], and [Password] elements to reduce the risk of being breached:
- [Port]: Change the SSH remote login port to a [Non-22 Port] (Section 4.4).
- [Username]: Create a [Non-root] new user and disable root SSH remote login (Sections 4.5, 4.6).
- [Password]: Enable SSH RSA key authentication and disable password authentication (Section 4.7).
Remember to follow the order so you don't lock yourself out.
4.4 Change SSH Remote Login Port to Non-22 Port
Now, let's solve the [Port = 22] issue. (Note: Some VPS providers already use a non-22 port by default. You can skip this step or follow along to change it to another port).
Newbie Linux Basic Commands:
ID Command Name Command Description cmd-03nanoText Editor cmd-04systemctl restartRestart a specific service Newbie Linux Basic Configuration Files:
ID Config File Location File Description conf-01/etc/ssh/sshd_configSSH Remote Login Program Settings The first thing we need to do is [Use the
nanotext editor to open theSSH Remote Login Program Settings]. In Windows, you would "find the file and double-click it." What about in Linux? Look at the command description above; isn't it simple? That's right, it is:shellnano /etc/ssh/sshd_configAfter the file opens, you enter the
nanointerface. Observe briefly, and you'll find that it displays important shortcut keys at the bottom of the screen (in the red box below). It's like an open-book exam; no need for rote memorization. Isn't that thoughtful?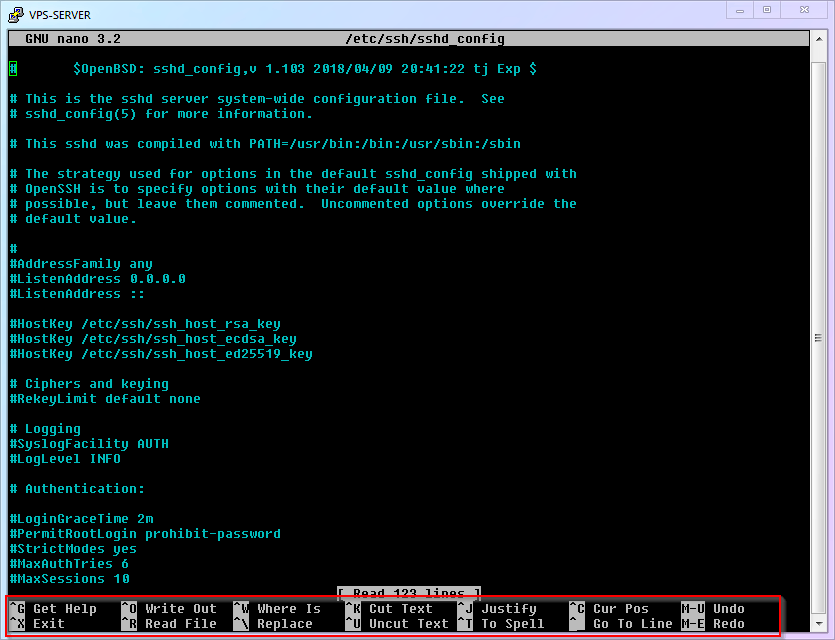
The second thing we need to do is [Find
Portin the opened file and modify its port number]. The number afterPortis the SSH port. It is generally recommended to change it to an integer greater than1024and less than65535(this article uses9753as an example). Combining withnanoshortcuts, how should we operate? As expected, you got it right again!- Use
ctrl+wto enter search mode, then typePort 22and hit Enter. - Delete
22and change it to9753. - Note: If the line starts with a
#, it means this line is [Not Effective] (commented out). You can write a new one without#at the end of the file like I did, or just delete the#.
WARNING
Using
9753as an example in this article means that with the release of this article, this port will become a minor characteristic. It might be prioritized by attackers or interfered with/blocked by the GFW. Therefore, I strongly suggest you use a different port number you come up with yourself. After all, you have over 60,000 ports to choose from freely.- Use
The third thing we need to do is [Save the file and exit].
- If you observed carefully in step 3, you'd notice that save isn't the common
ctrl+s. - Correct Shortcuts: Save is
ctrl+o+Enter, Exit isctrl+x. - (Some Operating Systems) Add a firewall rule for the new SSH port; otherwise, you won't be able to login via SSH after the instance restarts.
- Example for Ubuntu
ufw:
shellsudo ufw allow 9753/tcp- If you observed carefully in step 3, you'd notice that save isn't the common
The final thing to do is [Restart the SSH service to make changes take effect]:
shellsystemctl restart sshThen try to open a new session in your SSH software to see if you can connect. If there are issues, you can modify the configuration via the old SSH session (the SSH session that was already open when sshd restarted will not be closed).
Full process demonstration:

Modify PuTTY Configuration
Now that the new port is effective, you must use
9753the next time you log in with PuTTY. So, please go to PuTTY settings, change the port number, and Save Session. You know where to change it, right? (If not, re-read the previous content!)
4.5 Create a Non-root New User
Step two, let's solve the [Username = root] issue.
First, you need to understand that root in a Linux system is not just a simple administrator account. It is the foundation of the entire system, the master, the supreme god. Once the root account has a security issue, the entire system is at the mercy of others with nowhere to run. So follow me to operate:
Newbie Linux Basic Commands:
ID Command Name Command Description cmd-05adduserAdd a user to the system cmd-06apt installInstall specific software cmd-07visudoDedicated editor for modifying sudo permissions The first thing to do is [Add a new user and set a login password]. You can name it whatever you want; I will use
vpsadminas an example:shelladduser vpsadminAfter executing the command, follow the prompts. Be sure to set a user password (don't forget that you won't see
******when typing the password). Afterward, the system will ask for some additional user info; you can ignore these and just keep hitting Enter.
WARNING
Using
vpsadminas an example means this username will also become a minor characteristic upon this article's release. Like the port, I strongly suggest you use a different username you create yourself.Full process demonstration:
The second thing to do is [Install the
sudofunction] (sudoallows a standard account to temporarily gain the power ofrootat critical moments to save the world).shellapt update && apt install sudoSmart users may have noticed this line is actually two commands. The first half
apt updateyou've seen and used before; it refreshes software version info. The latterapt installis the [Install Command]. Joined by&&, it means [Refresh available software, AND THEN install the latest version of thesudoprogram].The third thing to do is [Add the
vpsadminuser to thesudolist, granting them eligibility to borrowrootpowers].shellvisudoUnder
User Privilege Specification, add a line:vpsadmin ALL=(ALL) NOPASSWD: ALL.WARNING
I want to specifically explain the
NOPASSWDsetting. It means thevpsadminuser does not need to enter an extra password when usingrootprivileges. This is contrary to general security advice. The reason I recommend this is that many newcomers ignore danger and persist in using therootaccount simply because they find repeatedly entering passwords annoying. Weighing the lesser of two evils, I believe [The risk of using therootuser directly] is greater than [The risk of not entering a password when usingsudo], hence the recommendation.If you prefer to follow tradition and enter a password every time you use
sudo, change that line tovpsadmin ALL=(ALL:ALL) ALL.Full process demonstration:

4.6 Disable Root SSH Remote Login
Now you are getting familiar with Linux, so let's have you think: what is the first thing we need to do? Correct, it is still [Use the
nanoeditor to openSSH Remote Login Program Settings]. What? Can't remember how? Go review the content above and come back! ... Correct Answer:shellnano /etc/ssh/sshd_configFind the
PermitRootLogin Yesitem, and change its setting tono. Remember how? ... Correct Answer:- Use
ctrl+wto enter search mode, typePermitRootLogin, and Enter. - Delete
yesand change it tono.
- Use
Save the file and exit. Remember how? ... Correct Answer:
- Save is
ctrl+o, thenEnterto confirm. - Exit is
ctrl+x.
- Save is
Restart the SSH service to make changes take effect. Remember... Never mind, here is the answer:
shellsystemctl restart sshFull process demonstration:

Next time you log in via PuTTY, the
rootuser will no longer connect; you must switch the username tovpsadmin! For convenience, setvpsadminas the default login username in PuTTY. (Nagging Note: Don't forget to Save Session).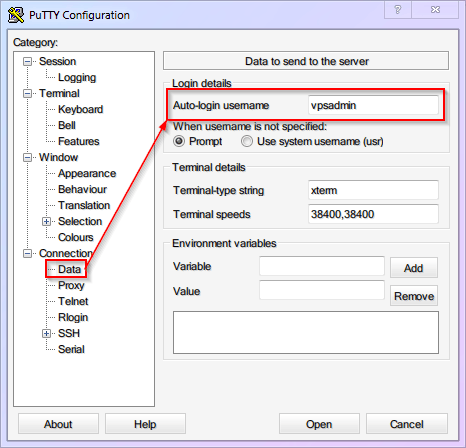
4.7 Use RSA Key Login and Disable Password Login
Step three, let's solve the problem of the [Password] potentially being brute-forced.
As mentioned earlier, hackers don't stupidly try every combination; they use cheat methods like "password dictionaries." Unless you use a randomly generated ultra-long password (via 1Password, macOS Keychain, etc.), you are easily vulnerable.
While ultra-long random passwords improve security, they are basically impossible to memorize and tedious to type manually. To solve this dilemma, we can abandon [Password Authentication] and switch to the more secure [Key Authentication].
[Key Authentication] involves generating a [Pair] of related key files (Public Key and Private Key). You upload the [Public Key] to the VPS. Every time you log in, SSH matches the [Public Key] with the [Private Key]. If the validation confirms it is the correct [Key Pair], authentication passes. (In other words, you don't need to remember or type complex passwords; you just need to protect the [Private Key] file from leaking).
WARNING
This article uses RSA keys as an example because RSA has a long history of support across various devices and SSH clients, and it currently provides sufficient security. However, it is by no means the only choice.
Other common keys include:
DSA- Mathematically proven insecure. Never use it.ECDSA- Small key size, high security, but its algorithm is suspected of having an NSA backdoor. If you have things on your VPS the NSA cares about, don't use it.Ed25519- An algorithm very similar toECDSAwith similar performance benefits. Its documentation is fully public, so it is generally considered backdoor-free.
Therefore, if your devices and software support it, I recommend prioritizing Ed25519 keys.
Now, let's configure [Key Authentication]!
Run
PuTTYgen(PuTTY Key Generator). Location:Start Menu-->All Programs-->PuTTY (64-bit)-->PuTTYgen.Click
Generateto start (move your mouse randomly in the blank area to increase randomness).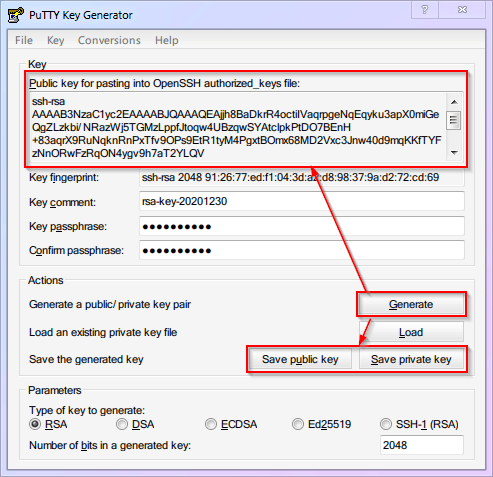
WARNING
The image uses a
2048bitRSAkey as an example. However, to achieve security equivalent toECDSA/Ed25519256bit keys, you need to use a3072bitRSAkey (change the number in the bottom right to3072).- You can set a password for the private key to add a layer of security.
- Click
Save public keyto save the public key, name itid_rsa.pub. - Click
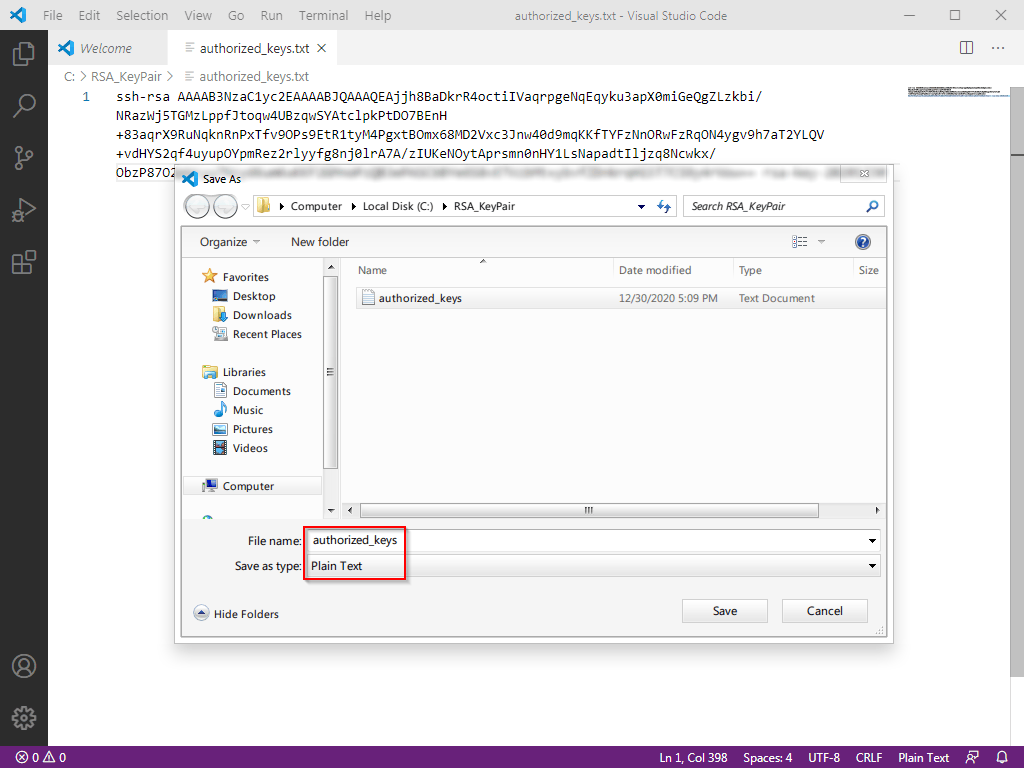
Save private keyto save the private key, name itid_rsa(PuTTY private keys come with a.ppkextension). - Most Importantly: Scroll down and copy all the content in the red box above, save it as a file named
authorized_keys. (Saving with vscode might default to a.txtextension; that's fine, we will remove the extension when uploading to VPS).
Upload the public key to the
vpsadminuser on the VPS.This step requires
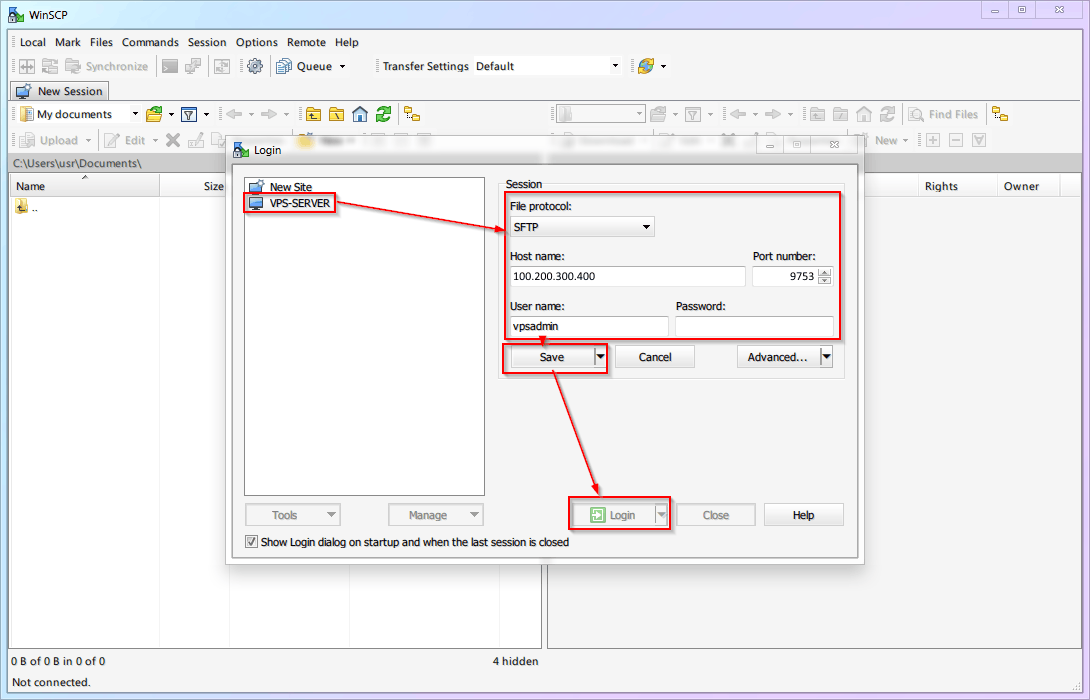
WinSCPwhich we prepared earlier.Download and install from the official site. It will prompt you to import PuTTY settings; do it!

If it doesn't prompt or you installed it earlier, configure it as shown below.
The left directory in WinSCP is your local computer; locate the folder where your keys are.
The right directory in WinSCP is the VPS. Default is
/home/vpsadmin/. ClickX hiddenin the bottom right to show hidden files.
Right-click on the right side (VPS) and create a new folder named
.ssh(Note the dot.).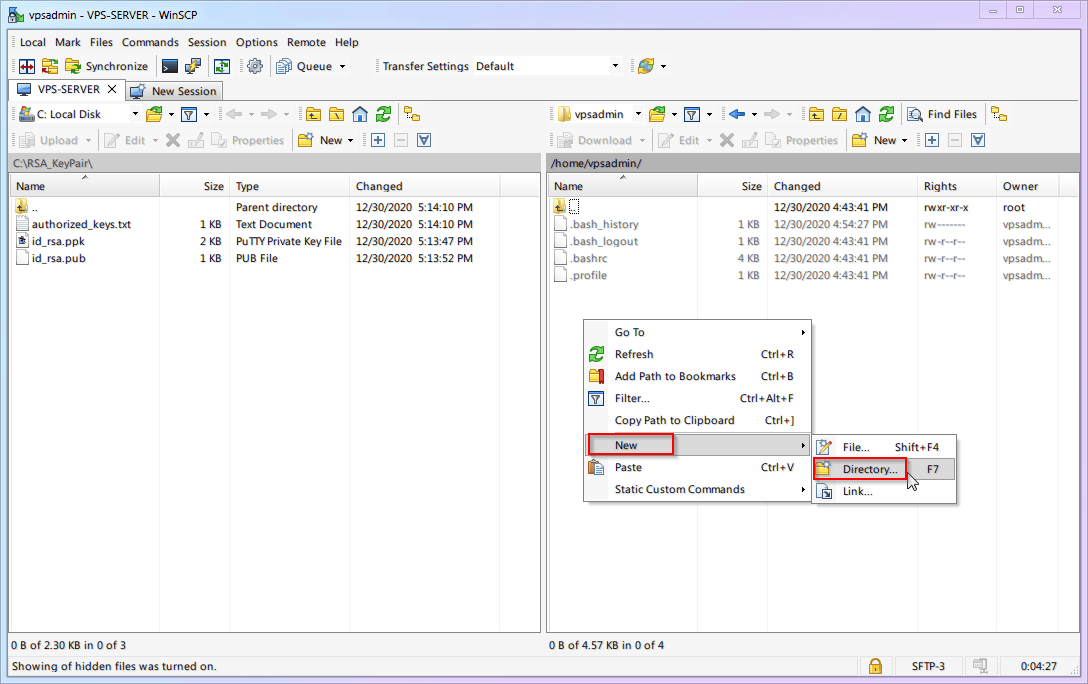
Upload the [Public Key]
authorized_keysinto the.sshfolder.
During upload (or after), rename
authorized_keys.txttoauthorized_keys(remove the.txtextension).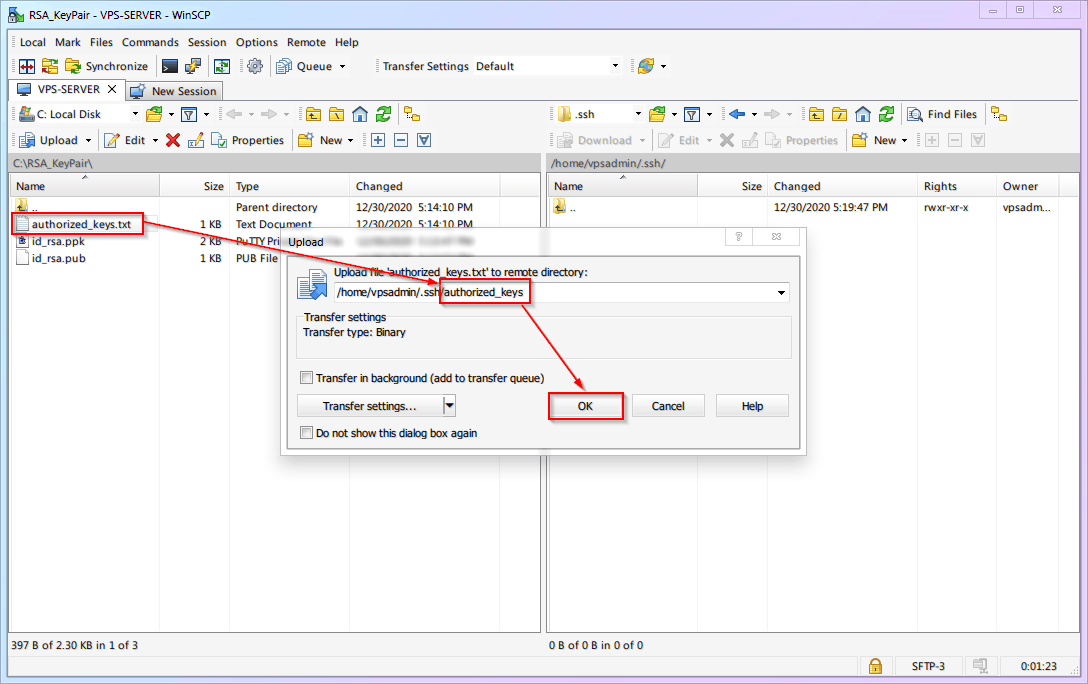
Full process demonstration:

Configure VPS to Enable RSA Key Login and Disable Password Login.
Newbie Linux Basic Commands:
ID Command Name Command Description cmd-08sudoRun a command with rootprivilegescmd-09chmodChange permissions of target file/folder Remote SSH into your VPS (PuTTY).
Change permissions of
authorized_keysto600(Read/Write for owner only).shellchmod 600 ~/.ssh/authorized_keysModify SSH Configuration. We've done this many times, but now we are the normal user
vpsadmin, not the omnipotentroot. We don't have permission to edit SSH config directly. We need thesudocommand:shellsudo nano /etc/ssh/sshd_configFind (
ctrl+w)PasswordAuthenticationand change it tono.Find (
ctrl+w)PubkeyAuthenticationand change it toyes. Save (ctrl+o) and Exit (ctrl+x).Restart SSH service. (Nagging Note: Don't forget you need
sudofor permission now).shellsudo systemctl restart sshFull process follows:

Configure PuTTY to use the Private Key. The VPS side has the public key. Now specify the private key location for PuTTY to use during login (Nagging Note: Don't forget to Save Session).
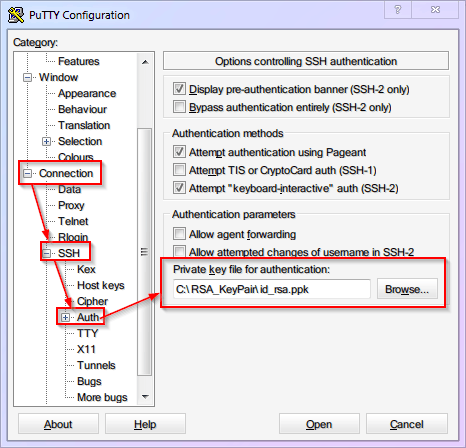
At this point, [Key Login] is enabled, [Password Authentication] is disabled, and PuTTY has the default username and private key saved. In the future, just load the
VPS-SERVERconfig in PuTTY and clickOpenfor one-click login.If you set a password for your private key, you will need to enter that passphrase to unlock the key when logging in, as shown below:

Don't forget to configure the key for
WinSCPas well, otherwise, you won't be able to log in to transfer files later: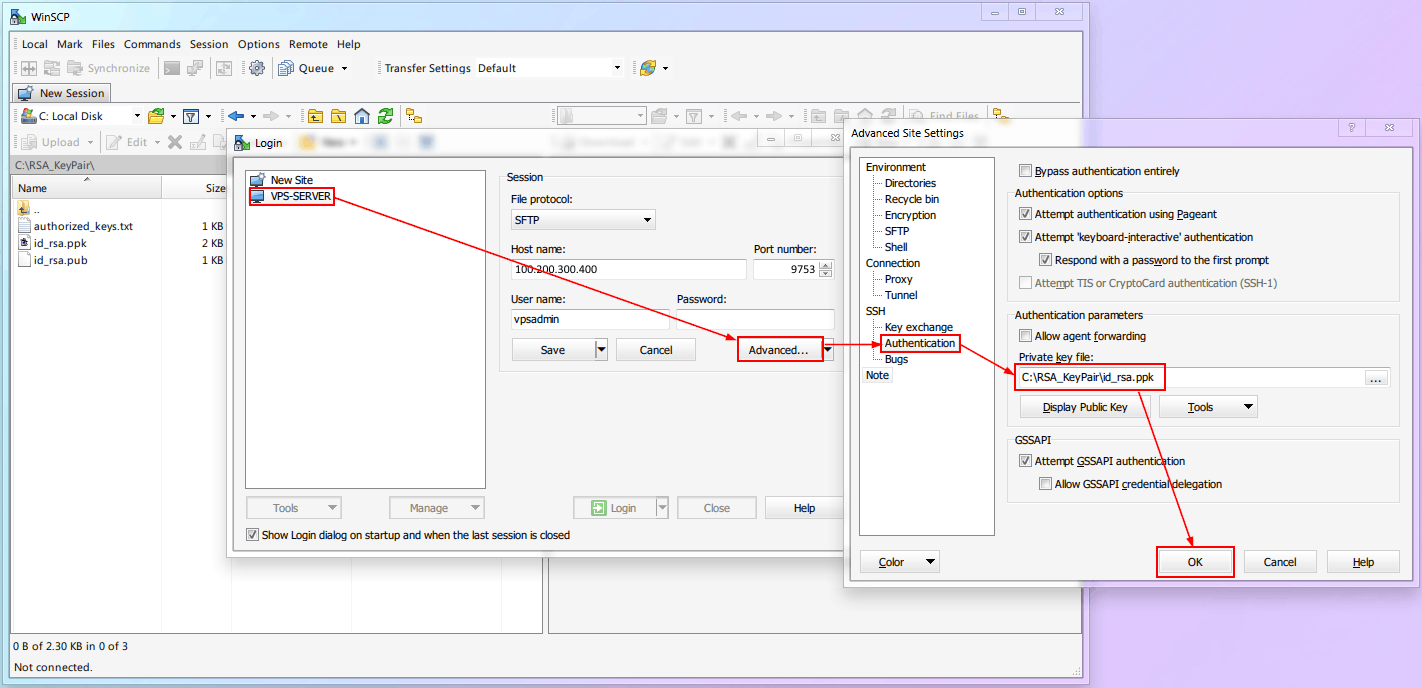
WARNING
Any software that needs to log in via SSH will now require key authentication. There are too many software options to show individually, so please configure them yourself according to your needs.
4.8 Your Progress
Up to this point, your VPS has completed the basic security guarantees for the three elements: [Port], [Username], and [Password]. While far from impregnable, common malicious scripts should no longer be able to harm you!
Now we finally have a secure system foundation. In the next chapter, we can start gradually installing and configuring the infrastructure required for Xray! (What infrastructure? A webpage, a certificate).
⬛⬛⬛⬛⬜⬜⬜⬜ 50%
