[Chapter 7] Xray Server Guide
7.1 Extensive Preparation, Effortless Execution
During the writing of this article, a pro jokingly complained to me: "Your tutorial has been running for 6 chapters and still hasn't reached Xray? People who don't know better might think this is a 'Build Your Own Website' tutorial." (I couldn't even refute that.jpg!)
Actually, this structure was a decision made after much deliberation. Only by laying a solid foundation can you achieve twice the result with half the effort later on and overtake others quickly. I've seen many newcomers in groups who can't even use nano correctly, don't know how to use WinSCP, and naturally, the config.json they hand-edit remotely is full of errors, making debugging a struggle.
WARNING
After the preparations in the first 6 chapters, we have climbed over several mountains together: Basic Linux operations, VPS remote management, website setup, domain management, certificate application, etc. Looking back, doesn't it seem quite simple? Now that we have such solid preparation, the upcoming installation and configuration of Xray will feel completely natural and effortless.
What needs to be done next is very simple:
- Installation
- Configuration (e.g., installing TLS certificates,
config.json) - Running
- Optimization (e.g., updating the kernel, enabling
bbr, auto-redirectinghttptohttps, etc.)
7.2 Installing Xray
First, the official carrier of Xray is the binary program generated by the xray-core open-source project (based on the MPL 2.0 open-source license). If you run this binary on a server, it is the server-side; if you download it to your local computer and run it, it is the client-side. The main difference lies in the [Configuration].
For installation, using the official installation script is simple and direct. It provides multiple installation options. Interested users can check the script instructions in the official installation script repository. This article uses the [Non-root User] installation mode.
At the time of writing, the installation script has a few small bugs when using a non-root account, so I decided to separate these steps. This also serves as a good opportunity to explain the delete command in Linux.
Linux 101 - Basic Commands:
Number Command Name Command Description cmd-14rmDelete command Download the installation script locally:
shellwget https://github.com/XTLS/Xray-install/raw/main/install-release.shExecute the installation command:
shellsudo bash install-release.shAfter use, you can delete the script:
shellrm ~/install-release.shWARNING
When using the
rmcommand to delete a file, it defaults to deleting the file in the current folder. However, I still wrote the full path:~/install-release.sh. This is a safety habit of mine when usingrm, and it is also something I wanted to emphasize by breaking the installation into steps. If you've heard jokes about "programmers deleting the database and running away," you probably understand why.The complete process demonstration is as follows:

7.3 Configuring TLS Certificates for Xray
Although we have already applied for TLS certificates earlier, according to the official documentation of acme.sh, it is not recommended to use the applied certificates directly. The correct method is to use the --install-cert command to install them for the required program. Now, let's install the certificate for xray-core to use.
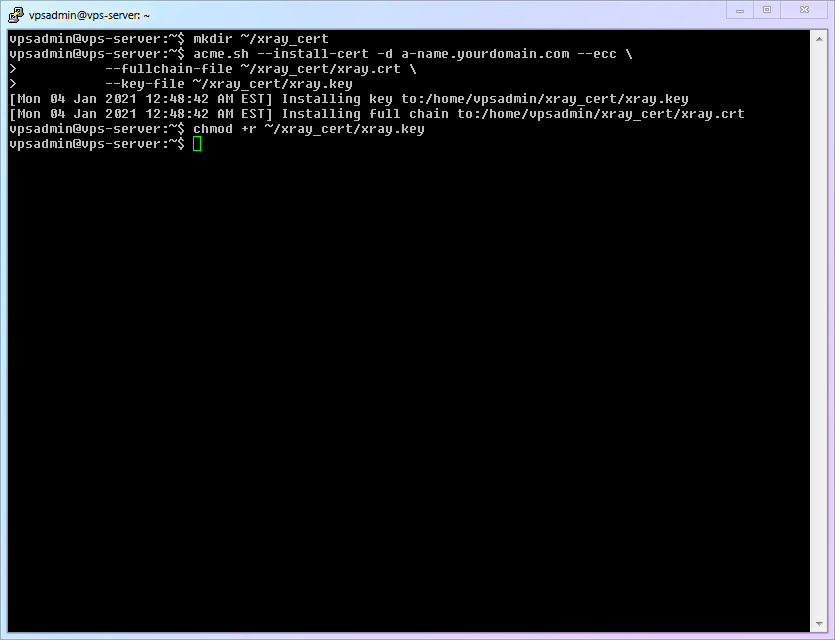
To avoid various potential permission issues with non-root accounts, we create a certificate folder under the vpsadmin account.
shellmkdir ~/xray_certUse
acme.sh's--install-certto correctly install (copy) the certificate files.shellacme.sh --install-cert -d subdomain.yourdomain.com --ecc \ --fullchain-file ~/xray_cert/xray.crt \ --key-file ~/xray_cert/xray.keyThe
xray.keyfile is not readable by other users by default, so we need to grant it read permissions.shellchmod +r ~/xray_cert/xray.keyThe process is simple, so no GIF is provided:
acme.shchecks every day and automatically updates certificates that expire within 30 days. Xray reloads the certificate automatically by default, so you don't need to worry about certificate updates.
7.4 Configuring Xray
First, various configurations can refer to the official VLESS configuration examples. This article will configure a most streamlined method based on the official examples: [Single VLESS protocol inbound + Port 80 fallback], satisfying maximum speed and necessary security for most scenarios.
Generate a valid
UUIDand save it for later use (UUIDcan be simply understood as an ID, like a fingerprint, that almost never repeats).shellxray uuidCreate log files and folders for later use.
Linux 101 - Basic Commands:
Number Command Name Command Description cmd-15touchCreate a blank file Create a [Log Dedicated Folder] inside the
vpsadminfolder.shellmkdir ~/xray_logGenerate the two required log files (access log, error log).
shelltouch ~/xray_log/access.log && touch ~/xray_log/error.logWARNING
This location is not the standard
Xraylog file location. Placing it here is to avoid permission issues causing trouble for newcomers. Once you are familiar with it, it is recommended to revert to the default location:/var/log/xray/access.logand/var/log/xray/error.log.Since Xray defaults to running as the
nobodyuser, we need to allow other users to have "write" permissions (*.logmeans all files with thelogsuffix; the efficiency advantage of theCLIinterface gradually appears here).shellchmod a+w ~/xray_log/*.log
Use
nanoto create theXrayconfiguration file.shellsudo nano /usr/local/etc/xray/config.jsonCopy the entire file below into it, and fill in the previously generated
UUIDinto line 61"id": "",. (After filling it in, it looks like"id": "uuiduuid-uuid-uuid-uuid-uuiduuiduuid"). I have added various verbose annotations to this configuration file in this article to help you understand the function of each configuration module.json// REFERENCE: // https://github.com/XTLS/Xray-examples // https://xtls.github.io/config/ // Common config files, whether server or client, have 5 parts. Plus newbie interpretation: // ┌─ 1*log Log Settings - What to write, where to write (evidence available when errors occur) // ├─ 2_dns DNS Settings - How to query DNS (prevent DNS pollution, prevent snooping, avoid matching domestic sites to foreign servers, etc.) // ├─ 3_routing Routing Settings - How to classify and process traffic (whether to filter ads, split domestic/international traffic) // ├─ 4_inbounds Inbound Settings - What traffic can flow into Xray // └─ 5_outbounds Outbound Settings - Where the traffic flowing out of Xray goes { // 1_Log Settings "log": { "loglevel": "warning", // Content from least to most: "none", "error", "warning", "info", "debug" "access": "/home/vpsadmin/xray_log/access.log", // Access record "error": "/home/vpsadmin/xray_log/error.log" // Error record }, // 2_DNS Settings "dns": { "servers": [ "https+local://1.1.1.1/dns-query", // Prefer 1.1.1.1 DoH query, sacrifices speed but prevents ISP snooping "localhost" ] }, // 3_Routing Settings "routing": { "domainStrategy": "IPIfNonMatch", "rules": [ // 3.1 Prevent local server loop issues: e.g., intranet attacks or abuse, wrong local loops, etc. { "ip": [ "geoip:private" // Routing condition: rules named "private" in the geoip file (local) ], "outboundTag": "block" // Routing strategy: hand over to outbound "block" processing (blackhole blocking) }, { // 3.2 Prevent server from directly connecting to domestic (CN) IPs "ip": ["geoip:cn"], "outboundTag": "block" }, // 3.3 Block Ads { "domain": [ "geosite:category-ads-all" // Routing condition: rules named "category-ads-all" in the geosite file (various ad domains) ], "outboundTag": "block" // Routing strategy: hand over to outbound "block" processing (blackhole blocking) } ] }, // 4_Inbound Settings // 4.1 Here only one simplest vless+xtls inbound is written, because this is Xray's most powerful mode. If needed, please add others based on templates. "inbounds": [ { "port": 443, "protocol": "vless", "settings": { "users": [ { "id": "", // Fill in your UUID "flow": "xtls-rprx-vision", "level": 0, "email": "vpsadmin@yourdomain.com" } ], "decryption": "none", "fallbacks": [ { "dest": 80 // Default fallback to the probe-resistant proxy } ] }, "streamSettings": { "method": "tcp", "security": "tls", "tlsSettings": { "alpn": "http/1.1", "certificates": [ { "certificateFile": "/home/vpsadmin/xray_cert/xray.crt", "keyFile": "/home/vpsadmin/xray_cert/xray.key" } ] } } } ], // 5_Outbound Settings "outbounds": [ // 5.1 The first outbound is the default rule, freedom is direct connection (VPS is already on the external network, so direct connection) { "tag": "direct", "protocol": "freedom" }, // 5.2 Blocking rule, blackhole protocol sends traffic into a black hole (blocking) { "tag": "block", "protocol": "blackhole" } ] }
- The complete process demonstration is as follows:
7.5 Start Xray Service!! (And check service status)
If you have followed this article step by step, you have actually avoided the most common pitfalls of insufficient log file permissions and insufficient certificate file permissions. So now, running Xray should naturally be incredibly smooth.
Enter the command below and enjoy the historic moment of starting
Xray!!!shellsudo systemctl start xrayJust
startdoesn't confirm if we have successfully opened the Xray service. To determine its status, use the following command.shellsudo systemctl status xraySee that green, delightful
active (running)? It saysXrayis running correctly.The complete process demonstration is as follows:

7.6 Reviewing systemd for Basic Service Management
So far, we have used systemctl related commands like start, status, reload, etc. These are general commands for managing various services in the Linux system based on the systemd management module. Now is a good time to familiarize yourself with a few other related commands.
If you need to temporarily stop the
Xrayservice, use thestopcommand:shellsudo systemctl stop xrayIf you need to restart the
Xrayservice, use therestartcommand:shellsudo systemctl restart xrayIf you need to disable the
Xrayservice (prevent Xray from running automatically after computer restart), use thedisablecommand:shellsudo systemctl disable xrayIf you need to enable the
Xrayservice (ensure Xray runs automatically after computer restart), use theenablecommand:shellsudo systemctl enable xray
7.7 Server Optimization 1: Enable BBR
The Legendary
BBRI believe that when you search for various scientific internet access technologies (censorship circumvention), you must have heard of
bbrmore than once. Under the embellishment of various blogs, it seems miraculous. There are also a bunch of derivatives likebbrplus,bbr2,modified bbr, etc., as if they were magic oils that can turn a cheap line into a dedicated line.So, what exactly is this thing? Is it useful? And which version should be used?
The Actual
BBRBBR = Bottleneck Bandwidth and Round-trip propagation time. It is a TCP congestion control algorithm. To understand it simply and crudely, it is traffic management for data: when the highway is not jammed, every car can naturally maintain a faster speed.
So is it useful? Generally speaking, there is a perceptible difference between
With BBRandWithout BBR(improvements in speed, stability, and latency), so [It is highly recommended to enableBBR].However, after enabling it, the difference between
BBRin4.xand5.xis often subtle and subjective. The decisive factor causing the experience difference is still the line quality. So [Do not obsess over versions, do not blindly chase the new, just follow your distribution's kernel updates].Are
bbrplus,bbr2,modified bbrand other versions with cool-sounding names better?In one word: No! Don't use these! These are names made up just to attract attention!
Those things with cool-sounding names are essentially kernels that the authors have rebuilt with their own tweaked
BBRparameters. These scripts merely download and install those modified kernels for you.Kernel stability is the cornerstone of a stable server operation. [The subtle performance difference brought by modified BBR versions is absolutely not worth swapping for an unstable kernel.] Please choose the latest kernel supported by your Linux distribution, which maximizes the long-term stability and compatibility of the server.
WARNING
The so-called "lead" of modified
bbrhas a very strong timeliness. For example, manybbrplusscripts have not been updated for years, and to this day will still downgrade your kernel to a very old version, leaving your system insecure or even unbootable.Which algorithm is better:
fq,fq_codel,fq_pie,cakeor others?In one word: If you don't understand, please keep
fq. It is sufficient and will not degrade your line.RuiSu (ServerSpeeder), Finalspeed, LotServer, and other "Acceleration Tools"
In one word: Do not use these! Throw them into the trash bin of history!
The only problem they can solve is the packet loss rate. To use an imprecise analogy: originally you used one car to deliver your goods, sometimes the car broke down halfway (packet loss). After using these, you directly send out 3 identical copies of the goods, letting three cars deliver at the same time. As long as one doesn't break down, it gets delivered. The road is full of your cars, so naturally, you squeeze others out. But predictably, when you squeeze others, others will also squeeze you. The exit road of the entire computer room is only so wide, and eventually, it is bound to turn into a massive collective traffic jam.
Note
Their principle is not algorithm optimization or speed boosting; most are simple and crude multi-packet sending. For poor lines with [very high packet loss rates], they might have some effect, but for good lines with low packet loss rates, [they have no optimization effect, and instead will multiply your traffic consumption], thereby causing unnecessary pressure on the server and your neighbors.
If your line really has a ridiculously high packet loss rate, the truly reliable solution is to [Change the Line].
I've been rambling so much because there are too many misconceptions and pitfall scripts fooling newbies surrounding
BBR. I hope you now have a relatively clear understanding ofBBR. Next, let's enableBBR!Create a parameter configuration file and enable
BBR.shellsudo nano /etc/sysctl.d/99-bbr.confAdd the following content into it:
net.core.default_qdisc=fq net.ipv4.tcp_congestion_control=bbrRead the configuration to make the
BBRsettings take effect.shellsudo sysctl --systemConfirm
BBRis enabledIf you want to confirm if
BBRis enabled correctly, you can use the following command:shellsysctl net.ipv4.tcp_congestion_controlIt should return a result like this:
net.ipv4.tcp_congestion_control = bbrIf you are wondering about the
ipv4here, don't worry — it's just legacy naming, and the setting takes effect for IPv6 as well.If you want to confirm if the
fqalgorithm is enabled correctly, you can use the following command:shellsysctl net.core.default_qdiscIt should return a result like this:
net.core.default_qdisc = fq
7.8 Server Optimization 2: Enable Auto-Redirect from HTTP to HTTPS
We previously set up an
httpwebpage on port80and used it to apply for a TLS certificate.But if you tried to access our interface using a browser, you would find that
httpaccess does not automatically upgrade tohttpsaccess like most websites. In other words, under our current settings,http(80)andhttps(443)are completely independent. To solve this problem, some modifications are needed.Edit the Nginx configuration file.
shellsudo nano /etc/nginx/nginx.confAdd the following statement to the Server block listening on port 80 that we set up, then save and exit (you can also delete the
rootandindexlines):return 301 https://$http_host$request_uri;Add a local port listener at the same level as port
80to provide webpage display. This article uses port8080for demonstration. (It can be any port).server { listen 127.0.0.1:8080; root /home/vpsadmin/www/webpage; index index.html; add_header Strict-Transport-Security "max-age=63072000" always; }Restart the Nginx service.
shellsudo systemctl restart nginxModify the Xray fallback setting, changing the fallback from port
80to port8080. (Find"dest": 80and change it to"dest": 8080).shellsudo nano /usr/local/etc/xray/config.jsonRestart the
Xrayservice to complete the setup.shellsudo systemctl restart xrayThe complete process demonstration is as follows:
When you enter
http://a-name.yourdomain.com, it should now automatically redirect to https.
7.9 Server Optimization 3: Richer Fallbacks
If you need richer fallback functionality, you can refer to 《Fallbacks (fallbacks) Feature Analysis》
7.10 Your Progress
Congratulations!! At this step, you already possess a server capable of proper scientific internet access (censorship circumvention), and also a camouflage website that prevents active probing attacks. Next, just install the appropriate software on your client, and you can enjoy a smooth network!
⬛⬛⬛⬛⬛⬛⬛⬜ 87.5%
7.11 Important Errata
In the first edition, the
Xrayconfiguration fileconfig.jsonfolder location was incorrect. If you operated according to the previous location,Xraywould not start correctly. Therefore, the correction is explained here. Please check yourself. Sorry for the inconvenience!- Correct location:
/usr/local/etc/xray/config.json - Incorrect location:
/usr/local/etc/config.json
Affected sections:
- 7.4 Configuring
Xray- 3. Usenanoto create theXrayconfiguration file - 7.8 Server Optimization 2 - 6. Modify
Xray's fallback settings
- Correct location:
In the first edition, when modifying the
Nginxconfiguration filenginx.conf, the content was incorrect (webpage folder location error). If you operated according to the previous location,Nginxwould not find the correct website. Please check yourself. Sorry for the inconvenience!- Correct folder location:
root /home/vpsadmin/www/webpage; - Incorrect folder location:
root /var/www/website/html
Affected sections:
- 7.8 Server Optimization 2 - 4. Add a local port listener at the same level as port
80to provide webpage display
- Correct folder location:
