[Chapter 5] Website Setup
5.1 Why create a website?
Newcomers might be confused: why do I need to build a website just to access the "scientific internet" (circumvent the firewall)? I don't know programming; isn't it very troublesome?
Let's answer the first question. Reasons for building a website:
- To apply for a legitimate TLS certificate (Very important).
- To provide a reasonable fallback mechanism to prevent active probing attacks and improve security.
- To build a camouflage site (such as a blog, private cloud drive, multimedia site, game site, etc.) so that there is a legitimate front-end when accessed directly, making traffic usage look more reasonable.
Now for the second question:
- This article, as a demonstration, uses only a very simple [single-file HTML page + Nginx] to achieve the above goals, so it is very simple.
- This website can be more than just camouflage; you can actually make it big and strong. The complexity depends entirely on you.
- For the goals of "camouflage" and "website operation," what is needed is individuality and showing your true self. Interested students can search and learn on their own. This content has completely deviated from "scientific internet access," so this article will not delve into it.
5.2 Login to VPS, Install and Run Nginx
The commands used here have been explained in detail previously, so they won't be repeated. Students who don't understand can review the previous chapters.
shellsudo apt update && sudo apt install nginxAfter completion, Nginx runs automatically. Now open a browser on Windows and enter
http://100.200.300.400:80. If you see the interface below, Nginx is running normally.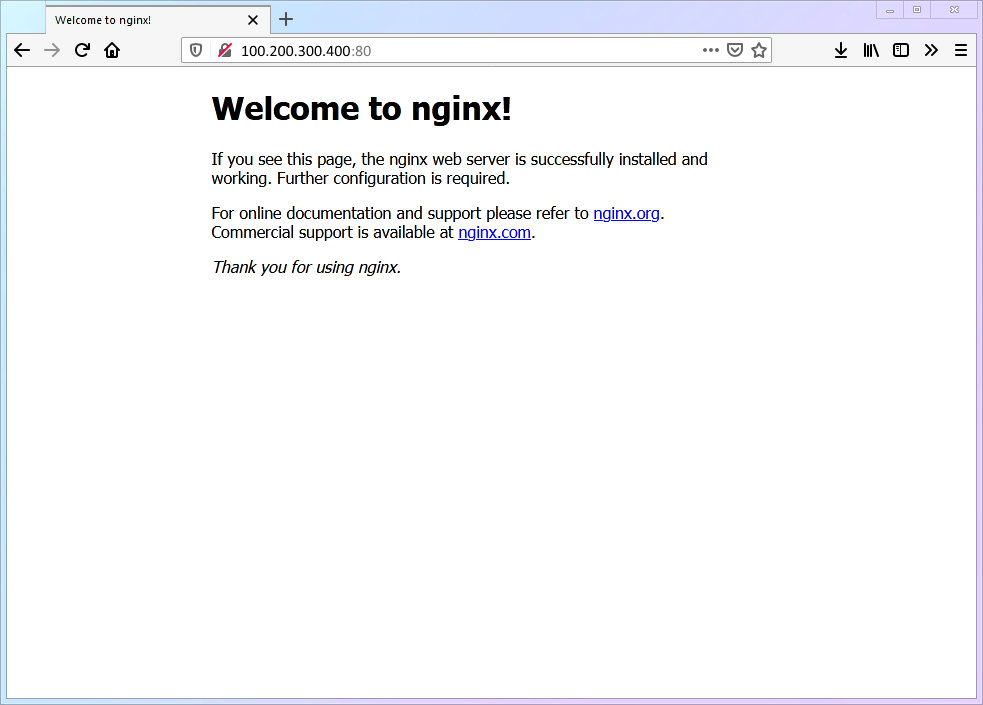
If you cannot see the Nginx default page mentioned above, you may need to configure the default firewall component, Uncomplicated Firewall (UFW), on the Debian system to enable HTTP (80) and HTTPS (443) port traffic.
a. Verification method, input:
shellsudo ufw statusb. If the output is as follows, indicating ports 80 and 443 are not enabled, proceed to step c.
shellStatus: active To Action From -- ------ ---- 22/tcp ALLOW Anywhere 22/tcp (v6) ALLOW Anywhere (v6)c. Command to enable Nginx ports 80 and 443 in UFW:
shellsudo ufw allow 'Nginx Full'd. Enter the command from step a again to verify. If the output is as follows, it means Nginx traffic has been allowed by the firewall, and you should be able to see the Nginx default page mentioned in point 2.
shellStatus: active To Action From -- ------ ---- 22/tcp ALLOW Anywhere Nginx Full ALLOW Anywhere 22/tcp (v6) ALLOW Anywhere (v6) Nginx Full (v6) ALLOW Anywhere (v6)
5.3 Create a Very Simple Web Page
Basic Linux Commands for Beginners:
Code Command Name Description cmd-10mkdirCreate a new directory cmd-11systemctl reloadReload a service Basic Linux Configuration Files for Beginners:
Code File Location Description conf-02/etc/nginx/nginx.confNginx program settings Create a dedicated folder for the website
/home/vpsadmin/www/webpage/and create the webpage fileindex.html.shellmkdir -p ~/www/webpage/ && nano ~/www/webpage/index.htmlWARNING
If you are not using the username
vpsadmin, please understand the meaning of the“~”symbol in this command (this relates to the content you will write in [Step 5]):- If you are a [non-root user],
“~”is equivalent to/home/username. - If you are the [root user],
“~”is equivalent to/root.
- If you are a [non-root user],
Copy the content below completely into the file, then save (
ctrl+o) and exit (ctrl+x).html<html lang=""> <!-- Text between angle brackets is an HTML tag and is not displayed. Most tags, such as the HTML and /HTML tags that surround the contents of a page, come in pairs; some tags, like HR, for a horizontal rule, stand alone. Comments, such as the text you're reading, are not displayed when the Web page is shown. The information between the HEAD and /HEAD tags is not displayed. The information between the BODY and /BODY tags is displayed.--> <head> <title>Enter a title, displayed at the top of the window.</title> </head> <!-- The information between the BODY and /BODY tags is displayed.--> <body> <h1>Enter the main heading, usually the same as the title.</h1> <p> Be <b>bold</b> in stating your key points. Put them in a list: </p> <ul> <li>The first item in your list</li> <li>The second item; <i>italicize</i> key words</li> </ul> <p>Improve your image by including an image.</p> <p> <img src="https://i.imgur.com/SEBww.jpg" alt="A Great HTML Resource" /> </p> <p> Add a link to your favorite <a href="https://www.dummies.com/">Web site</a>. Break up your page with a horizontal rule or two. </p> <hr /> <p> Finally, link to <a href="page2.html">another page</a> in your own Web site. </p> <!-- And add a copyright notice.--> <p>© Wiley Publishing, 2011</p> </body> </html>Grant read permissions to other users for this file:
shellchmod -R a+r .Modify
nginx.confand restart theNginxservice to point http access on port80to thehtmlpage just created.Modify
nginx.conf.shellsudo nano /etc/nginx/nginx.confAdd the following segment inside
http{}, then save (ctrl+o) and exit (ctrl+x). (Remember to replace the domain name with the real domain name including the subdomain you prepared earlier).nginxserver { listen 80; server_name subdomain.yourdomain.com; root /home/vpsadmin/www/webpage; index index.html; }Special Note!
As mentioned in my hint in [Step 3], please make sure
/home/vpsadmin/www/webpageis changed to your actual file path.Reload the
nginxconfiguration to make it effective.shellsudo systemctl reload nginxThe complete setup process is shown below:
Now, if you visit
http://subdomain.yourdomain.comand see a page like this, it means success: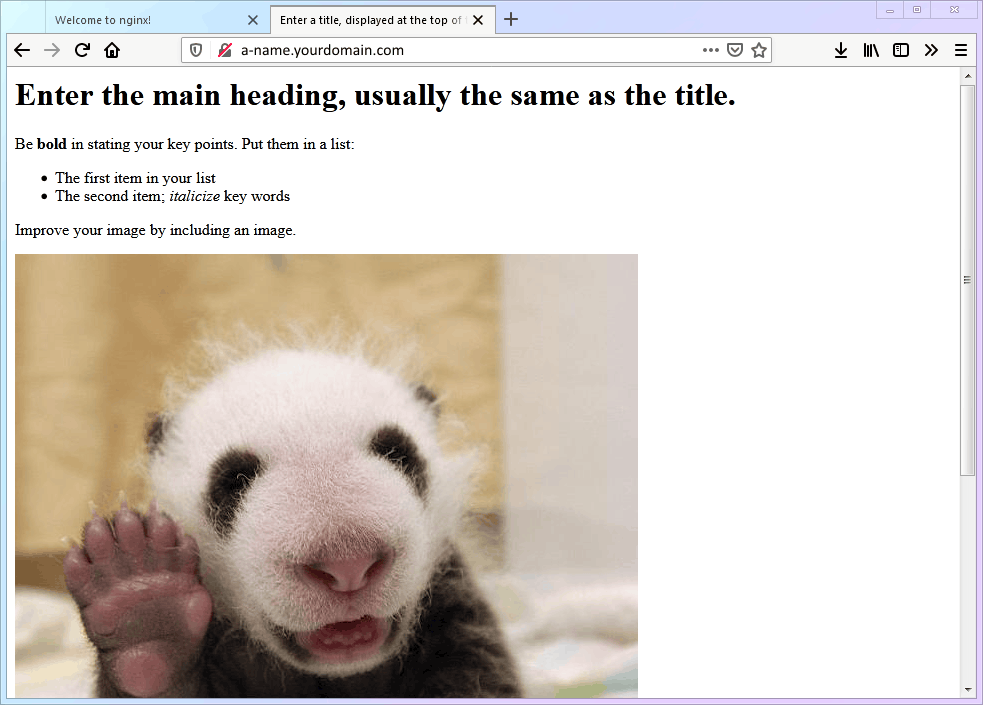
5.4 Explanation of Common Errors
First, if you followed the instructions in the article step by step and were careful enough, you definitely wouldn't encounter errors. Therefore, I do not intend to modify how this article is written.
So why do many students still get stuck at this step and can't open the webpage? Basically, it comes down to one word: carelessness. There are only two potential configuration problems here, and only two causes.
I. Two Problems:
- The path
/home/vpsadmin/www/webpageinnginx.confdoes not match your actual file path, songinxcannot find the file. - The path is correct, but
nginxdoes not have permission to read it.
II. Two Causes:
- Using a [non-root user] but still copying the commands from the article directly without modification. (This is basically like copying a classmate's name along with their answers during a test).
- Insisting on using the [root user].
Students encountering errors should look back carefully at the instructions in [Step 3] and [Step 5-2] of section [5.3].
WARNING
Earlier in this article, a significant amount of space was dedicated to explaining the importance of using a [non-root user] for security, and the entire text is written based on this premise. Therefore, problems caused by using the [root user] are not within the scope of this article's design.
However, I believe that students who insist on using the [root user] likely have their own opinions, strong hands-on abilities, or a certain Linux foundation. I have explained the crux of the problem, and I trust you can solve it on your own.
5.5 Your Progress
At this point, Xray's first infrastructure component, the [Website], is in place. We will immediately move on to the second infrastructure component: [Certificates]!
⬛⬛⬛⬛⬛⬜⬜⬜ 62.5%

